

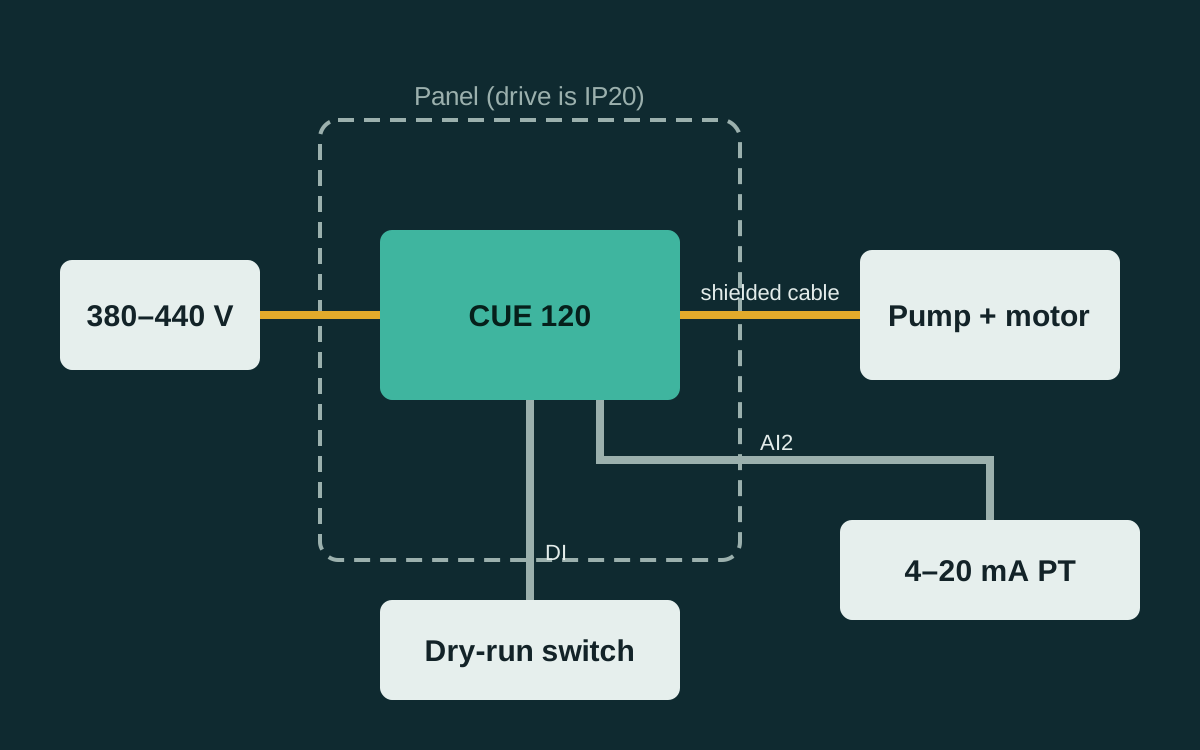
A Grundfos CUE 120 saves energy and protects the pump only when it is installed and set up for the system it controls. This checklist follows the order our engineers use on site, from choosing the rating to handing over a commissioned booster or cooling-water pump.
1. Choose the right rating
- Read the motor nameplate: rated power, full-load current, voltage and frequency.
- Pick a CUE 120 whose rated output current is at least the motor's full-load current. The range runs from 1.5 kW to 22 kW.
- Confirm the supply is in the 380–440 V class. The drive tolerates 304–456 V, which helps on sites with unstable supply.
2. Plan the panel
- The CUE 120 is IP20, so it must sit inside a panel, away from water spray, dust and direct sun.
- Allow ventilation for the drive's heat, especially in pump rooms that get hot in summer.
- Fit the incoming protection and isolator the drive manual specifies, and keep the panel door labelled with the pump it controls.
3. Wire it cleanly
- Use shielded motor cable, earthed at both ends, and keep the motor run as short as practical.
- Run signal cables (transmitter, level switch, Modbus) separately from power cables to avoid interference.
- On older motors, check the insulation before connecting a drive; a motor that has been rewound several times may need attention first.
- Remove any star-delta starter or contactor between the drive and the motor; the drive does the starting.
4. Add the sensor and protections
- Fit a 4–20 mA pressure transmitter on the discharge header, away from bends and valves, and wire it to analog input AI2.
- Wire a low-level or dry-run switch from the sump to a digital input so the drive stops the pump when there is no water.
- Use the relay output for a fault signal to the panel indicator or BMS.
5. Commission the drive
- Enter the motor nameplate data.
- Choose the control mode. V/f control suits most centrifugal pumps; vector modes are for applications that need high torque at low speed.
- Set the minimum and maximum frequency. Check the pump's minimum speed, especially for submersibles, which need flow past the motor for cooling.
- Set acceleration and deceleration ramps to avoid water hammer.
- Enable the PID, set the pressure setpoint and the transmitter range, then tune it so pressure settles without hunting.
- Set sleep frequency, delay and wake-up pressure for night-time low demand.
- Turn on the automatic energy-saving function where the load allows it.
- Copy the final parameters to the keypad so identical pumps can be set up the same way.
6. Test under real demand
Open outlets on the top floor and the ground floor, or vary the process flow, and watch pressure, frequency and current. Record the settings and readings in the handover sheet so later service visits start from known values.
Common mistakes we fix
| Problem on site | Usual cause |
|---|---|
| Pump runs at full speed all the time | Setpoint above what the pump can reach, or transmitter wired to the wrong input |
| Pressure hunts up and down | PID gains left at default, or transmitter mounted next to a valve |
| Pump never stops at night | Sleep mode not enabled, or a leaking tap or non-return valve |
| Drive trips on overcurrent at start | Ramp too short, wrong motor data, or a mechanical fault in the pump |
| Random faults and display noise | Unshielded motor cable or signal cables run with power cables |
Monitoring several pumps
The built-in RS-485 port with Modbus RTU lets a PLC, SCADA or BMS read speed, current and faults from each drive and synchronise several drives. Optional Ethernet, Profibus and Profinet cards are available for larger plants.
Read next
Get a CUE 120 for your pumps
Fluid Pumps & Systems is an authorized Grundfos distributor in Coimbatore, serving Tiruppur, Erode, Salem, Namakkal and the Nilgiris. Our engineers supply, wire and commission the CUE 120 with a pressure transmitter and dry-run protection. Send us the pump and motor nameplate photos on WhatsApp at +91 99655 35227 and we will recommend the right drive rating, sensor and panel.
Source: Grundfos CUE 120 product brochure. Always follow the drive's installation manual and local electrical rules.